
The Live Input feature enables you to route external audio via your soundcard into OtsAV's powerful audio pipeline, i.e. a microphone, record player, external CD player, Mini Disc player, etc.
Note: ASIO soundcard support is not yet implemented for Live Input. This will be added in future, and will eliminate the small "delay" heard previously, when using WDM drivers.
Live announcing: Announce live between your played songs, or over the top of them.
Satellite news feeds: Place a Live Input On or Live Input Trigger directive immediately after a Time Sync directive, and you can re-broadcast a satellite news feed or syndicated show.
Tape/Vinyl: Route tapes or records through OtsAV's audio pipe line. You can save your vinyl or tape recordings in a digital format. For recording instructions click here.
Route another program's audio via OtsAV's pipeline: If you have a second soundcard in your computer, then you could set it to be the default and connect its line out into your primary soundcard's line in. Then, you can use other audio programs at the same time as OtsAV and have their sound come through the OtsAV audio pipeline.
Stand-alone Dynamics Processor: It is possible to use OtsAV as a standalone EQ/Dynamics Processor. Simply select the Enable Live Input option in the Options -> Live Input -> At Program Startup menu, or launch OtsAV with the /LIVEINPUT option. This will cause it to immediately begin routing the live input signal. All EQ and Dynamics Processor settings are remembered from your last session, so you can have a fully customized EQ/Dynamics Processor. For instructions on configuring the /LIVEINPUT command line click here.
For instructions on how to set up a microphone through Live Input click here.
For instructions on how to set up an external device (news feed, record player) through Live Input click here.
For instructions on how to operate the Live Input device click here.
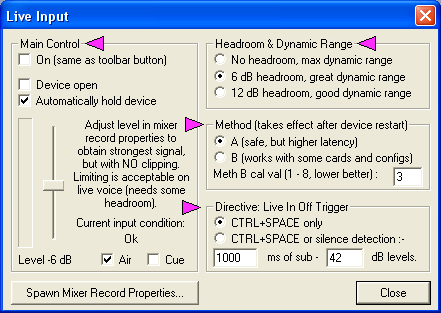
To find the Live Input dialog box go to the Options -> Live Input -> Show Live Input control box....
Tip:
Click next to the ![]() to be taken to the related section description.
to be taken to the related section description.
On: Turns Live Input on or off (Same as toolbar icon).
Device open: Opens or closes the input (recording) device.
Automatically hold device: Instructs OtsAV to keep the device open even after you disable Live Input.
Note: It is good practice to keep the "Automatically hold device" option enabled so that when you select Live Input it will activate immediately.
Level Slider: This slider adjusts the Live Input level. Adjust level to obtain the strongest signal with no clipping.
Air: This option enables/disables the Live Input in the "On Air" output channel.
Cue: This option enables/disables the Live Input in the "Cue" channel output.
Spawn Mixer Record Properties: This button will open the Windows mixer record properties, which enables you to adjust the input level into OtsAV.
OtsAV has a separate limiter for the Live Input feature to counteract peaks in the live input signal. The Headroom & Dynamic Range settings enables you to adjust the Live Input limiter to suit your application.
No headroom, max dynamic range: In this mode the limiter is disabled. Use this if your input signal is already well regulated; e.g. when playing from a CD player or if you have a professional radio broadcast feed.
6 dB headroom, great dynamic range: Use this by default for all input types. This setting is more forgiving while still retaining a decent dynamic range. This setting can be used for a microphone.
12dB headroom, good dynamic range: This setting is suitable for widely fluctuating input levels, or unprocessed, uncontrollable sources. This setting is great for a microphone.
This is where you can Optimize the Live Input latency.
The OtsAV Live Input subsystem does have a certain amount of latency. This is due to the inherent latency in most soundcard's live input circuitry. It is recommended to experiment with the Method B scheme as the latency can be far better if this method works with your soundcard.
Method A: This conservative scheme is the default. This will work on all soundcards.
Method B: With certain soundcards you should be able to reduce the latency to approximately 100ms. You will need to experiment with different "cal val" values. Start with '1', and progress upwards until you hear a clear input signal with no audible artifacts. A value of '3' is optimum on a number of soundcards.
Ctrl + Space: This setting enables you to use the Ctrl + Space key press to turn off the Live Input when using the Live Input Trigger Directive.
Ctrl + Space or silence detection: This setting enables you to use the Ctrl + Space key press or silence detection to turn off the Live Input when using the Live Input Trigger Directive.
Note: For silence detection you need to enter the period of silence in milliseconds into the x milliseconds text box, and the silence detection level in the - x dB levels text box. You may need to experiment with these setting to get an optimum threshold.
For instructions on configuring the Live Input Trigger directive click here.
How to set up a microphone through Live Input
How to set up an external device through Live Input
How to record an external device