
Any Ots item, including audio only, video and CD+G items, can have a beat chunk added to it, allowing it to be used with Automated beat mixing within OtsAV.
Note: Automated Beat Mixing is only possible using Ots files. If you haven't converted your media to Ots files, use the Batch Conversion Tool in Ots Studio.
Note: To add a Beat Info chunk to all of your Ots files in a batch process, see here.
Adding a Beat Chunk to an Ots Item
1. Open an Ots file in Ots Studio
by clicking on the  icon in the Toolbar.
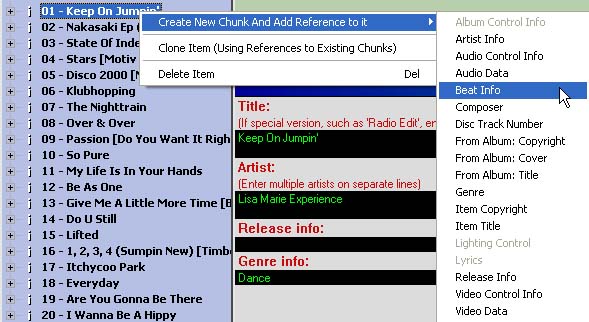
2. Right-click on an Item, and select Create New Chunk And Add Reference to it -> Beat Info
3. A summary of the Beat Chunk can now be seen on the right-hand side. The values displayed are set by default, however these will change to reflect the actual values once you have beat tracked the item.
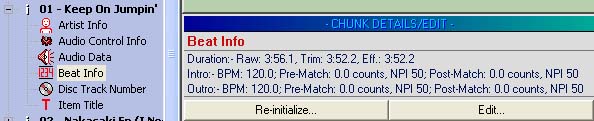
Re-initialize... button: Resets all values within the Beat Chunk
to default values (not set).
Edit... button: Opens the Edit Beat Info window.
To add a Beat chunk to all of your Ots files, including Automatic BPM detection, you can instruct Ots Studio to do this task in a batch process.
This tool can be found in Ots Studio under Tools -> Batch Auto-Detect BPM, Beat...
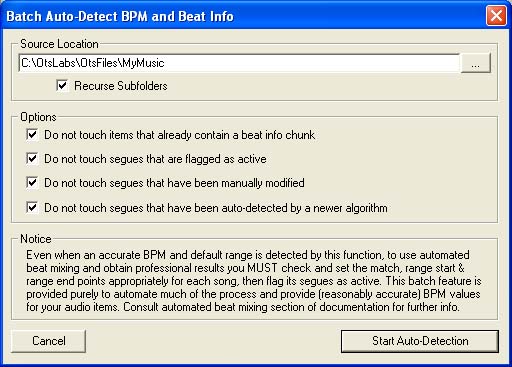
1. Specify the parent folder containing your Ots files. Check the Recurse Subfolders checkbox if you have Ots files in subfolders.
2. Leave the Options checkboxes as is, unless you had previously created Beat chunks for your Ots files. If you have already created Beat chunks for your Ots files, the following options are available.
Do not touch items that already contain a beat chunk: Any Items that already contain a Beat chunk will not be re-processed.
Do not touch segues that are flagged as active: Any Intro or Outro Ranges flagged as Active, will not be re-processed.
Do not touch segues that have been manually modified: Any Intro or Outro Ranges that have been manually modified will not be re-processed.
Do not touch segues that have been auto-detected by a newer algorithm: The BPM Auto-Detection algorithm will continue to be improved in future Ots Studio versions. If you are processing Ots files that have already been processed by a newer algorithm than the one you are using, you can opt not to re-process the Ots file if a newer algorithm was used in the Ots file.
3. Click the Start Auto-Detection button to begin.
Note: Depending on the size of your music library, and the speed of your computer, this process may take some time. Start this process before going to bed, and the process should be completed by morning.