| Ots Studio |
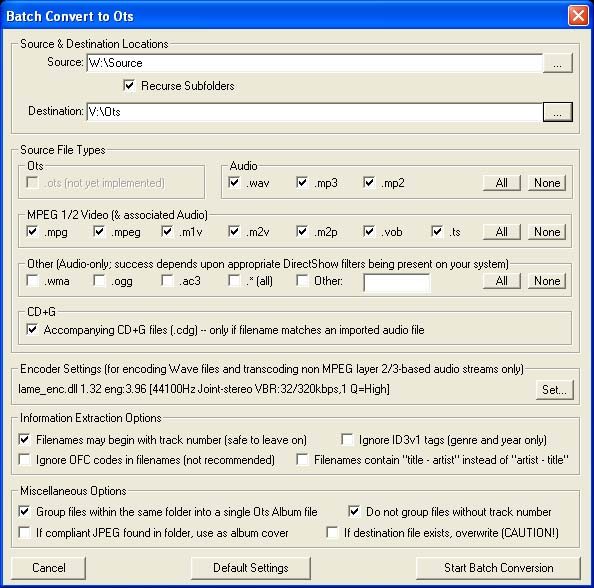
To gain the benefits of Ots files, you will need to convert your existing media collection to the Ots file format. Ots Studio now has a Batch Conversion Utility, which replaces the Ots MP3 Conversion Utility. To access the Batch Conversion Utility in Ots Studio, go to File -> Batch Convert to Ots..., or press Ctrl+B on your keyboard. The window below will appear.
To learn more about each section of the Batch Converter, click on the relevant area.
Note: The Batch Conversion Utility will use the parent folder name as the Album Title within your Ots files. For example, if your folder name is Bryan Adams - So far , So Good, the words So Far, So Good will be used as the Album Title. Any text before the hyphen (-) is regarded as the Artist name, and will not be included in the actual Album Title.
To aid in the conversion process, you will benefit from naming your folders and files in an appropriate manner. Below is the suggested method for organizing your folders and files.
Store all of your source material, such as MP3 and VOB files under a parent folder.
For example, D:\Videos for any video based files, and D:\Audio for any audio based files.
Within each parent folder, create folders containing the Artist name and Album Title.
For example, D:\Audio\Bryan Adams - So Far, So Good
The contents of D:\Audio\Bryan Adams - So Far, So Good should contain the individual audio files, with number prefixes which will be used to sort the tracks into their original order in the resulting Ots file.
For example...
01-Bryan Adams - Summer of '69.mp3
02-Bryan Adams - Straight From The Height.mp3
03-Bryan Adams - It's Only Love.mp3
...etc.
Tip: For compilation CDs or DVDs, use only the Album Title as your folder name. Do not include any Artist information, such as Various Artists.
Note: To group an album folder's contents into one Ots Album file requires the "Group files within the same folder into a single Ots Album file" option to be checked in the Miscellaneous Options section (see below for more information on this option).
Source & Destination Locations
Source: Choose the location of your source media, such as MP3, VOB, and CD+G files. Check the Recurse subfolders option to convert any media contained within subfolders.
Recurse Subfolders: Check this box to convert all corresponding media in subfolders.
Destination: Choose the destination of the converted files (Ots files).
Tip: To see a complete list of supported file types that can be converted to Ots files, click here
Audio: Choose whether to convert only .wav, .mp2, or .mp3 audio files. You can also exclude these file types by clicking on the None button. Click on the All button to check all boxes.
MPEG 1/2 Video (& associated Audio): Choose whether to convert only .mpg, .mpeg, .m1v, .m2v, .m2p, .vob, or .ts video files. You can also exclude these file types by clicking on the None button. Click on the All button to check all boxes.
Other (Audio-only; success depends upon appropriate DirectShow filters being present on your system): Choose whether to convert only .wma, .ogg, .ac3, or a specified type of audio file. You can also exclude these file types by clicking on the None button. Click on the All button to check all boxes.
Note: Consult the Supported Media Types section to learn more about using DirectShow filters.
CD+G: If you have any CD+G content within the folders being converted, you must check this box. The converter will "pair" any .cdg files with their audio partner, regardless of the file type of the audio. For example, if you have WMA+G, MP3+G, OGG+G, or FLAC+G karaoke files, the converter will successfully create an Ots item with CD+G content.
Note: If using non-MPEG based audio, the converter will re-encode the audio to MP3 (using the Lame encoder settings) or uncompressed PCM if that option is selected in Ots Studio Encoder Settings.
This area shows a summary of your current Encoder Settings. To change your Encoder Settings, click on the Set button. To learn more about using the Lame encoder, click here, or uncompressed PCM, click here.
Information Extraction Options for Item Title, Artist & Track Number / Album Title
Filenames may begin with a track number: Check this box if you are using number prefixes in your filenames. For example, 01-Artist - Title.mp3.
Filenames contain "title - artist" instead of "artist - title": Check this box if you have your filenames as Title - Artist.mp3.
Ignore OFC codes in filenames: Check this box if you want the converter to ignore OFC codes in your filenames. To learn about OFC codes, click here.
Ignore ID3v1 tags: Check this box if you don't want to use the Genre and Release information stored in the ID3v1 tag.
Group files within the same folder into a single Ots Album file: Use this option to group all songs within a folder into a single Ots Album file. Un-check this option if you want to create Ots files that contain only one song per file.
If compliant JPEG found in folder, use as album cover: If you have scanned the cover of your CD or DVD, you can have it automatically added to your Ots file(s). The JPEG must be a certain size, check here for more information.
Do not group files without a track number: Use this option if you have some files that don't have a leading track number (01, 02,...) in the filename, and you don't want these files grouped in the Ots file.
If destination file exists, overwrite (CAUTION!): Check this option if you want to overwrite any existing Ots files with the same Album Title, in the same folder. If you are simply adding new content to your Ots file library, do not select this option.
Note: If the Batch Conversion Utility experiences any problems during conversion, any problematic files will be skipped, allowing the remainder of the conversion to take place. A summary will be presented at the completion of the conversion process. Check the Summary Log for any problematic files that may have been skipped.