
OtsAV can be controlled using the Behringer BCD3000/2000 MIDI Controller. To enable this controller in OtsAV, go to Options -> OHM / MIDI Hardware Control -> OHM / MIDI Configuration, and select Behringer BCD3000 in both Input Device and Output Device drop-down sections. Select (Ots) Behringer BCD3000 in the MIDI Mapping File area. (Select the BCD2000 mapping file if using the BCD2000 controller.)
Note: The Behringer control panel software must be set to B-DJ or Standard (not Advanced) in the Global Mode section before enabling the controller in OtsAV.
Tip: To enable this controller every time OtsAV is launched, select Options -> OHM / MIDI Hardware Control -> Enable Controller at Program Startup (controller must be powered on before launching OtsAV)
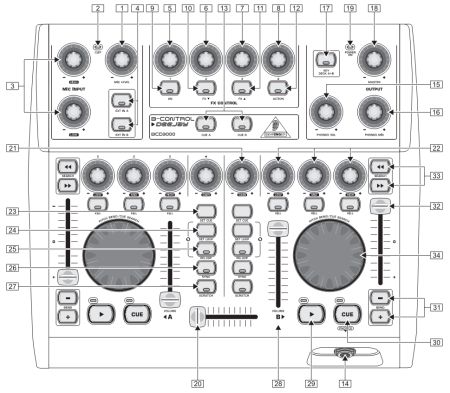
Below is the layout of the Behringer BCD3000 MIDI controller. Further below is a description of each of the controls, and which functions they control in OtsAV. (The BCD3000 and BCD2000 models have the same control layout, but some buttons are labelled differently. The control descriptions below refer to the BCD3000, with the BCD2000 equivalent in brackets.)
Note: Some controls have more than one purpose, and can perform different functions, depending on what states the OtsAV Decks are in.
1, 2, 3. Various controls
No interaction with OtsAV. Consult your Behringer manual for more information.
4. Ext buttons (BCD2000: Talkover and
On-Air)
Ext In A - Toggles AutoDJ on/off.
Ext In B - Toggles ABM on/off.
Note: ABM can be disabled independently from AutoDJ. If AutoDJ is disabled, ABM is automatically disabled. If ABM is enabled, and AutoDJ was disabled, AutoDJ is automatically enabled.
5, 6, 7, 8. Effect Knobs
Not mapped. These controls can be assigned by the user.
9. On
(BCD2000: A)
Used to trigger a video transition from deck B to Deck A when AutoDJ is
disabled. If there is no video
present on deck A, OtsAV will display Slideshow images (if Slideshow feature
enabled).
Tip: If the LED for this button is lit, Deck A is considered as the Master video.
10. FX
(down) (BCD2000: B)
Hide/Show the Video output from Deck A. This can be used quickly hide the
video if unsuitable content appears.
- When unlit, video from the deck is set to be shown on the output display.
- When flashing, video from the deck will not be shown on the output display
(even if deck is set as video Master).
11. FX
(up) (BCD2000: C)
Hide/Show the Video output from Deck B. This can be used quickly hide the
video if unsuitable content appears.
- When unlit, video from the deck is set to be shown on the output display.
- When flashing, video from the deck will not be shown on the output display
(even if deck is set as video Master).
12. Action
(BCD2000: D)
Used to trigger a video transition from deck A to Deck B when AutoDJ is
disabled. If there is no video
present on deck B deck, OtsAV will display Slideshow images (if Slideshow
feature enabled).
Tip: If the LED for this button is lit, Deck B is considered as the Master video.
Note: When an Automated Beat Mix is taking place, the lights on the buttons 9, 10, 11 and 12 become animated to warn you not to interrupt the ABM.
13. Cue A and Cue B (BCD2000: Analog
Input A and Analog Input B)
- Cue A toggles the Cue button on the OtsAV Mixer for Deck A, and will
send audio from Deck A to the designated CUE soundcard channel.
- Cue B toggles the Cue button on the OtsAV Mixer for Deck B, and will
send audio from Deck B to the designated CUE soundcard channel.
Note: The OtsAV Mixer will reflect these controller settings.
14. Headphone Jack
Set the ASIO CUE channel in OtsAV to the controller's "ASIO [3/4]"
soundcard option to send CUE audio to this output.
15.Phones Volume
Adjust the volume level of the headphone jack.
16. Phones Mix (BCD2000: PFL Mix)
Enables/Disables the CUE button on the Ots Mixer. When moved to the far
left, deck A CUE is enabled. When moved to the far right, deck B CUE is
enabled. (central position enables CUE buttons for both decks)
Note: The OtsAV Mixer will reflect these controller settings.
17. Key Deck A+B (BCD2000: Phone Split/Master
Out)
Toggles between the use of Tempo or Pitch sliders. (LED lit: Tempo, LED
unlit: Pitch)
18. Master Volume
No interaction with OtsAV. Increases or Decreases the volume sent to your
sound system.
19. Power LED
No interaction with OtsAV. Consult Behringer manual for more information.
20. Crossfader
Controls the OtsAV Mixer crossfader. Allows quick volume adjustment between
decks.
Note: The OtsAV Mixer will reflect these controller settings.
Note: Sync Logic is used if the controller slider and the slider on the OtsAV Mixer are in different positions. The controller slider will not adjust volume levels until the controller slider has passed the position of the OtsAV Mixer slider. (Alternatively, you can use the "Shift" button(23) to snap the sliders into like positions)
21. Gain dials
Increase or decrease the volume level of the Deck.
Note: This is the default setting for deck volume adjustments. The Volume sliders(28) are also capable of adjusting volume levels, but are disabled by default, as they are situated extremely close to the jog wheels, and may be bumped while scratching.
Note: Sync Logic is used if the controller dial and the slider on the OtsAV Mixer are in different positions. The controller dial will not adjust volume levels until the controller dial has passed the position of the OtsAV Mixer slider. (Alternatively, you can use the "Shift" button(23) to snap the controls into like positions)
22. Low, Mid, High EQ and Kill/Cut
switches
Knobs can be used to increase or decrease the level of low, mid, and high
frequencies. Kill switches allow for instant reduction of low, mid, and
high frequencies.
23. Set Cue (BCD2000: Back to Top)
Both buttons act as a "Shift" key, and can add additional features
to other controls.
- Pressing both "Shift" buttons at the same time will execute
a Mix Now feature and immediately fade to the next song. (same as clicking
on the next track button in OtsAV's Toolbar)
- Press and hold the "Shift" key and the Scratch button(27)
to toggle between conventional scratching and Zorphing.
- Press and hold the "Shift"
key and the Set Loop button(24) to load the next song in the main Playlist
to the deck. (fastest way to load the next song from your playlist)
- Hold this button and press Cue(30) to set the cue point while a song is playing.
- Hold this button while pressing Play(29) to force play the currently loaded song.
(used when AutoDJ is enabled. If you manually start the song around the
same time that AutoDJ would start the song, you don't want to accidentally
Pause the song if OtsAV has already started it.)
24. Set
Loop
- Not mapped as a stand-alone button. This control can be assigned by the
user.
- Press and hold the "Shift" key(23) and the Set Loop button to load the next
song in the main Playlist to the deck. (fastest way to load the next song
from your playlist)
25. Reloop
Not mapped. This control can be assigned by the user.
26. Sync (BCD2000: Slave)
Matches the BPM of the opposite Deck.
Note: The Pitch or Tempo may be adjusted on the selected deck, depending on which slider you are controlling at the time. (e.g. if the slider is set to move the Pitch slider in OtsAV, then the Pitch slider is used to match the BPM of the opposite deck)
27. Scratch
- When held, scratch using the jog wheel(34).
- When not held, the jog wheel can be used for Pitch/Tempo bending.
- Press and hold one "Shift" key(23) and the Scratch button to toggle between
conventional scratching and Zorphing.
Tip: The Scratch LED will light up when in conventional scratching mode, and will flash rapidly when Zorphing.
28. Volume Sliders
Increase or decrease the volume level of the Deck. (disabled by default,
but can be enabled if you prefer to use sliders to adjust volume levels)
Note: The Gain dials(21) are also capable of adjusting volume levels, and are enabled by default, as they are situated away from the jog wheels. This reduces your chances of bumping the volume sliders unexpectedly while scratching.
Note: Sync Logic is used if the controller slider and the slider on the OtsAV Mixer are in different positions. The controller slider will not adjust volume levels until the controller slider has passed the position of the OtsAV Mixer slider. (Alternatively, you can use the "Shift" button(23) to snap the sliders into like positions)
29. Play
- Starts or Pauses playback.
- Hold the "Shift" button(23)
while pressing Play to "force play" the currently loaded song.
(used when AutoDJ is enabled. If you manually start the song around the
same time that AutoDJ would start the song, you don't want to accidentally
Pause the song if OtsAV has already started it.)
30. CUE
- Returns instantly to cue point if Deck is playing or paused.
- Press and hold to initiate Stutter Play if Deck is already at cue point
(great for sampling). Release the Cue button to return to cue point.
- Sets the cue point if in Frame Seek mode, or if pressed while scratching.
- Hold the "Shift" button(23)
and press Cue to set the cue point while a song is playing. (eliminates
the need to enter Frame Seek or Scratch mode to set the cue point)
Note: The Cue button will flash rapidly when the deck is in a state to set a Cue point.
31. Pitch
Bend buttons
Momentarily increase or decrease the speed of the playing song. Useful
for aligning beats while mixing.
32. Pitch/Tempo
slider
Adjusts the position of the Pitch and Tempo sliders in OtsAV. (use the
Deck A+B button(17) to swap between
Pitch and Tempo slider control)
Note: Sync Logic is used if the controller slider and the slider on the OtsAV deck are in different positions. The controller slider will not adjust playback speed until the controller slider has passed the position of the OtsAV deck slider. (Alternatively, you can use the "Shift" button(23) to snap the sliders into like positions)
33. Search
buttons
Enters Frame Seek Mode. Move backwards and forwards by frame, then press
Cue(30) to set cue point.
Tip: While in Frame Seek Mode, the Jog Wheel(34) can be used to seek more rapidly.
34. Jog
wheel
- Pitch/Tempo Bend the song.
- Scratch the song in the Deck when holding the Scratch button(27). (Zorphing is possible if the
Scratch button(27) has been set
accordingly)
- Frame Seek when in Frame Seek Mode (see 33)
The functions listed above are the default settings in the (Ots)
Behringer BCD3000 and (Ots) Behringer
BCD2000 Ots Hardware Mapping file.
The way in which each button or slider controls OtsAV can be customized to suit your needs. To learn more about editing/changing an OHM (Ots Hardware Mapping) file, see here.