
This section allows you configure MIDI Hardware controllers for use with OtsAV.
The following menu options are available under Options -> OHM / MIDI Hardware Control
Hardware Controller Enabled:
Enables/Disables the configured MIDI Hardware controller.
Enable Controller at Program Startup: Enables the last controller that was configured when OtsAV is launched.
Note: MIDI controller needs to be powered on (and set to MIDI mode if applicable) before OtsAV is launched.
OHM / Midi Configuration...:
This section allows you to select your MIDI controller, select an Ots
Hardware Mapping (.OHM) file, and perform basic MIDI testing. Click here to learn more.
Command Options -- Deck A:
Bend
Type: Set the type of Bending method used on Deck A. (Pitch or
Tempo)
Scratch
Type: Set the type of Bending method used on Deck A. (Pitch (Regular
Scratching) or Tempo (Zorphing))
Command Options -- Deck B:
Bend
Type: Set the type of Bending method used on Deck B. (Pitch or
Tempo)
Scratch
Type: Set the type of Bending method used on Deck B. (Pitch (Regular
Scratching) or Tempo (Zorphing))
Set OMHL Source Code Editor...: Choose your preferred text editing program to make changes to your .OHM files.
OHM / Midi Configuration... dialog box:
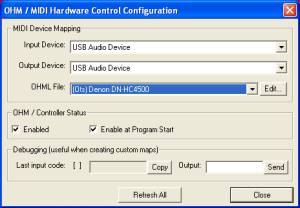
Input Device: Select
the MIDI Hardware Controller that will be controlling OtsAV. (some controllers
may be listed as a USB Audio Device)
Output Device: Select the MIDI Hardware Controller that OtsAV will be controlling OtsAV. (some controllers may be listed as a USB Audio Device)
Note: Only controllers that support 2-way MIDI can be used.
OHML File: Select the mapping file (.OHM) to use with the selected MIDI Hardware Controller.
Edit: Opens the selected .OHM file in a text editing program.
Tip: Don't edit any .OHM files that begin with (Ots), as these have been carefully created by Ots Labs. If you want to edit an existing (Ots) .OHM file, create a copy of it first, and make changes to the copy.
Enabled: Enables/Disables the configured MIDI Hardware controller.
Enable at Program Startup: Enables the last controller that was configured when OtsAV is launched.
Last Input Code: Displays the MIDI code received from a connected MIDI Hardware Controller. This can be used when editing/creating your own .OHM files.
Copy: Copies the MIDI code into the Windows Clipboard, ready for pasting into your .OHM file.
Output: Enter a MIDI code for your connected controller and click on the Send button to test the results on your controller. This is handy for testing LEDs.
Send: Sends the entered MIDI code to the connected controller.
Refresh All: Refreshes Input Device, Output Device and OHML File drop-down selection lists, and, disables/re-enables controller / OHM.