| Ots Studio |
An Audio Control Info (ACI) chunk is normally present for each item in an Ots file. The information contained in ACI chunks allows programs to play Ots files like a DJ would -- it allows them to be mixed! The overriding goal behind the design of the ACI specification was that any two songs in a particular collection, even if of entirely different styles, could be mixed together and the result would be totally acceptable from a professional stand point. We believe this goal has been realised with the design and implementation of the ACI chunk.
The powerful mixing that Ots software achieves is not purely the result of the ACI specification. It is also due largely to a very clever algorithm we developed that can generate ACI data automatically, without any user intervention! This is why with Ots software you don't have to spend months setting mix points for every song in your collection just to get decent mixing results!
Although the ACI data that is automatically generated when an Ots file is initially created is usually very good and results in perfect mixes, occasionally you will come across a song which could do with some manual tweaking. There are also other cases where manual adjustments are necessary to achieve a particular objective.
When you adjust the data in an ACI chunk, you are essentially instructing any playing software to mix according to the changes you have made. Not all of the variables that the ACI data contains are exposed and settable with the ACI chunk handler in Ots Studio. The powerful way in which Ots software mixes is highly complex and is based upon many variables. Only the important ones that a user may need to edit are even shown in the ACI chunk handler.
ACI is not a way of setting multiple cue points within a song.
ACI is not a way of achieving beat mixing. (This is done via the Beat Info chunk)
ACI is not a way of having one specific song mix into another particular song, or a limited selection of songs, in a specialised manner, only appropriate for those songs.
Although you can in theory achieve some of these things by manipulating the ACI data, you will likely end up breaking the basic premise of ACI, and rendering your Ots files not compatible with the broad base of Ots files in existence.
ACI IS a way of specifying important information about the intro and outro of a song, so that that song will mix perfectly into or out of any other song which also contains a correctly set ACI! The type of mixing we are referring to here is fade mixing, or what you commonly hear on commercial radio stations.
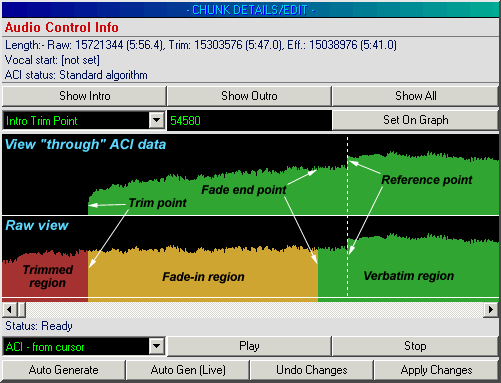
The following image shows the ACI chunk handler displaying a typical ACI chunk's intro. Study the following image carefully.
Diagram showing ACI chunk (Intro info)

The waveform display is in decibels, not linear amplitude like conventional waveform editors. The decibel scale is more in line with how our ears perceive sound, and is therefore more appropriate for this purpose. You'll notice two waveforms are displayed. This is not a stereo display, i.e. left and right! The bottom waveform shows the actual data -- raw -- in the audio data chunk, totally unedited and unaltered in any way. The top waveform displays the data in the audio data chunk as it appears when being interpreted via the current ACI settings. This is why above the trimmed (red) regions of the bottom waveform you see nothing in the top waveform -- it is trimmed and therefore does not exist when viewing the audio data in the context of the ACI. We'll call the bottom waveform the raw one, and the top, the ACI one!
The outro portion of a track contains the same points and functionality as the intro portion as shown above, but is in reverse. The intro and outro points of a track are totally independent from each other.
A trim point is marked on the waveform display by a change in colour between red and green/orange, if looking at the bottom waveform display. The red area represents the trimmed area, and therefore if you look at the top waveform display you will see nothing for this region, because it's trimmed!
The intro or outro trim point marks the absolute beginning or ending of the track. Anything before or after these points is treated as if it isn't really there. An intro trim point, for example, would normally be set so as to skip any silence present at the beginning of the track. These can be set anywhere, for example you may have a 5 minute long song, but have set the trim points so that only 10 seconds of the song is contained between them. If this track were played in playing software, it would appear for all intention purposes as just a 10 second track!
A fade point is marked on the waveform display by a change in colour between orange and green, when looking at the bottom waveform display. You will see the effect of the fade on the top waveform display.
The intro or outro fade point determines a fade region, either fade-in, or fade-out. A fade region is defined as that part of the track that lies between the trim point and the fade point. If these points are located at the same position within the track, then there is no fade region. These fade regions will have an artificial fade applied to them when the track is being played back. It has nothing to do with whether the underlying song contains a fade at that position or not -- but rather it is a directive to the playing software to apply an artificial fade throughout that region. Two fades are possible per track, a fade-in region and a fade-out region. Fades are important, as they allow you to have a track start and finish cleanly even though you may have set the trim points in a bit (say as to skip an unwanted intro).
A reference point is marked on the waveform display by a white dashed vertical line.
The reference points direct the precise timing of mixes. For example, the outro reference point is normally the time when the next track will be started. This also depends on the where the intro reference point is set for the track being started. If its intro reference point is "in a bit", i.e. not at the same location as the intro trim point, then the next song will actually begin a little earlier than where the outro reference point for the previous song lies. The amount of time earlier is the same period of time that exists between the intro trim point and intro reference point of the song being mixed into. This concept may be difficult to grasp for some people, but if you're struggling don't worry -- you don't really need to think much about this. Just be comfortable in the knowledge that Ots mixing works as well as it does because of all of this logic!
Note that the setting of these various points does not alter the audio data chunk in any way. You can edit things to your heart's content, safe with the knowledge that all edits you are making are non-destructive. Not only that, but if you want to get back to the automatic points set by our special algorithm, then simply click "Auto Generate", or do not apply the changes when you leave the chunk handler.