
In order for media files to be playable in OtsAV, they must first be imported into the Media Library. Files can be imported to the Media Library at any time while OtsAV is running using the Import/Refresh Files to Media Library tool. To learn more about the Media Library click here.
At present the following media files can be imported and played in OtsAV:
Ots Album files
Wave files
MP3 files
The latest version of OtsAV is able to play Wave and MP3 files directly without first converting to the Ots file format. This compatibility enables you to quickly get OtsAV up and running with your current media collection (if your collection is in Wave or MP3 format).
At the time of importing, your Wave and MP3 files are analyzed by OtsAV for efficient handling of the file. This information is stored in the Media Library file and in the Ots Media Extension (.OMX). The .OMX file is saved in the same folder as the associated Wave or MP3 file.
Note: The importing process for Wave and MP3 files will take a few moments per file, due to the data being retrieved, analyzed and stored. This process is a once off process due to the fact that the retrieved information will be stored in both the Media Library and an associated .OMX file.
To access the Import/Refresh Files
to Media Library dialog box click on the  icon on the toolbar.
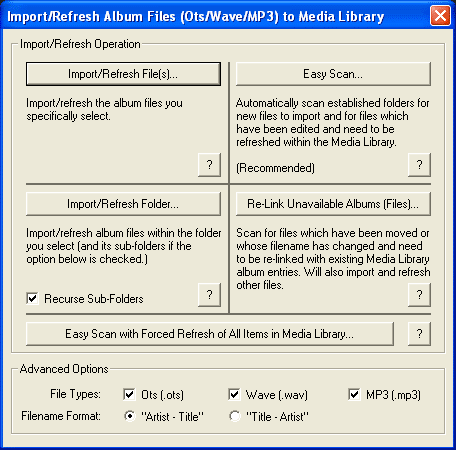
For instructions on how to import your files to the Media Library click one of the buttons on the dialog box image below, e.g. click on the Easy Scan button.
Import/Refresh Files to Media Library dialog box

Import/Refresh Files... button: This operation allows you to import specific files. If any of the files you select have already been imported, they are refreshed if they have changed since the last import/refresh.
Import/Refresh Folder... button: This operation allows you to import folders of music. If any of the files you select have been imported, they are refreshed if they have changed since the last import/refresh.
Tip: Check the Recurse Sub-Folders box to import from sub-folders.
Easy Scan... button: This operation will scan your MyMusic folder and all other folders where the Media Library currently references files. Any sub-folders within any of these folders are also scanned.
Hot Tip: Easy Scan is the recommended import/refresh method for new users.
Relink Unavailable Albums (Files)... button: This operation will scan for files which have been moved or whose filename has changed and need to be re-linked with existing Media Library entries. It will also import and refresh other files.
Easy Scan with Forced Refresh of All Items in Media Library... button: This operation will perform an Easy Scan and force a refresh of all Ots-based Media Library Items, regardless of whether they appear to have changed or not. This function is primarily intended for use after upgrading to a newer version of OtsAV that needs to extract additional information from your Ots files. After an upgrade, some functions may not work as intended until you have performed a full refresh.
File Types: Enables you to select the type of files you want to import.
Ots (.ots) option: Enable/disable the importing of Ots files.
Wave (.wav) option: Enable/disable the importing of Wave files.
MP3 (.mp3) option: Enable/disable the importing of MP3 files.
File Format: Enables you to select the labelling format for Wave and MP3 files at time of importing.
"Artist - Title" option: Use this option if your files use the this naming standard.
"Title - Artist" option: Use this option as the alternative, less common type.
How to Import/Refresh a Folder
Re-Link Unavailable Albums (Files)
How to remove Unavailable Albums (Files)
How to remove a folder from the Easy Scan path
Managing the Media Library categories
How to remove a file from the Media Library
How to set your My Music folder